Wichtig
Übersetzen ist eine Gemeinschaftsleistung Sie können mitmachen. Diese Seite ist aktuell zu 36.36% übersetzt.
25.2.1. DB Verwaltung
The DB Manager Plugin is intended to be the main tool to integrate and
manage spatial database formats supported by QGIS (PostgreSQL, SpatiaLite,
GeoPackage, Oracle Spatial, Virtual layers) in one user interface.
The  DB Manager Plugin provides several features.
You can drag layers from the QGIS Browser into the DB Manager, and it
will import your layer into your spatial database.
You can drag and drop tables between spatial databases and they will
get imported.
DB Manager Plugin provides several features.
You can drag layers from the QGIS Browser into the DB Manager, and it
will import your layer into your spatial database.
You can drag and drop tables between spatial databases and they will
get imported.
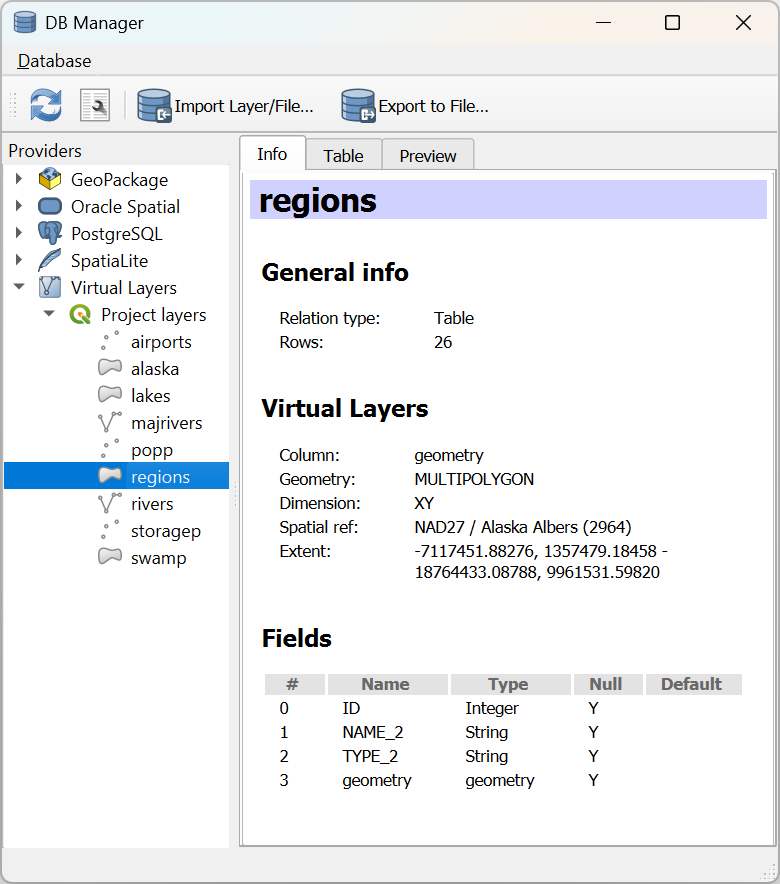
Abb. 25.4 Die DB-Verwaltung
The menu allows you to connect to an existing database, to start the SQL window and to exit the DB Manager Plugin. Once you are connected to an existing database, the menus (relevant for DBMSs, such as PostgreSQL) and will appear.
Das Menü enthält Werkzeuge zum Erstellen und Löschen (nur wenn leer) von Schemata und, falls Topologie vorhanden ist (z.B. mit PostGIS-Topologie), zum Starten eines TopoViewer.
Mit dem Menü können Sie Tabellen erstellen und bearbeiten sowie Tabellen und Sichten löschen. Es ist auch möglich, Tabellen zu leeren und Tabellen zwischen Schemata zu verschieben. Sie können Vacuum ausführen für die ausgewählte Tabelle. Mit Vacuum wird Speicherplatz zurückgewonnen und für die Wiederverwendung verfügbar gemacht. analyze aktualisiert Statistiken, die zur Ermittlung der effizientesten Art der Ausführung einer Abfrage verwendet werden. Protokollierung von Änderungen… ermöglicht das Hinzufügen der Änderungsprotokollierung zu einer Tabelle. Schließlich können Sie Layer/Datei importieren… und In Datei exportieren…
Bemerkung
Mit dem DB Manager ist es möglich, Kommentare für Tabellen und Spalten einer PostgreSQL Datenbank hinzuzufügen.
Das Fenster Datenanbieter listet alle existierenden Datenbanken auf, die von QGIS unterstützt werden. Mit einem Doppelklick können Sie sich mit der Datenbank verbinden. Mit der rechten Maustaste können Sie bestehende Schemata und Tabellen umbenennen und löschen. Tabellen können auch über das Kontextmenü in die Kartenansicht von QGIS eingefügt werden.
Wenn eine Verbindung zu einer Datenbank besteht, bietet das Hauptfenster des DB-Managers vier Registerkarten. Die Registerkarte Info bietet Informationen über die Tabelle und ihre Geometrie sowie über vorhandene Felder, Beschränkungen und Indizes. Hier können Sie einen räumlichen Index für die ausgewählte Tabelle erstellen. Die Registerkarte Tabelle zeigt die Tabelle an, und die Registerkarte Vorschau stellt die Geometrien als Vorschau dar. Wenn Sie ein SQL-Fenster öffnen, wird es in einer neuen Registerkarte platziert.
25.2.1.1. Arbeiten mit dem SQL-Fenster
Mit der DB-Verwaltung können Sie SQL-Abfragen für Ihre räumliche Datenbank ausführen. Abfragen können gespeichert und geladen werden, und der SQL Query Builder hilft Ihnen bei der Formulierung Ihrer Abfragen. Sie können sogar räumliche Ausgaben anzeigen, indem Sie Als neuen Layer laden aktivieren und Spalte(n) mit eindeutigen Werten (IDs), Geometriespalte und Layername (Präfix) angeben. Es ist möglich, einen Teil der SQL zu markieren, um nur diesen Teil auszuführen, wenn Sie Strg+R drücken oder auf die Schaltfläche Ausführen klicken.
QGIS also adds support for the REGEXP function in some providers.
This allows users to use regular expressions in SQL filters or expressions, for example:
SELECT * FROM places WHERE name REGEXP '^A';
This returns all features where the name field starts with the letter A.
After executing your query, you can select specific cells in the result set. Use the Ctrl+C shortcut to copy the selected cells to the clipboard. The copied data is available as a formatted table. This allows you to paste the data into other applications, such as spreadsheet where it will show up as a table.
Die Schaltfläche Abfrageprotokoll speichert die letzten 20 Abfragen jeder Datenbank und jedes Anbieters.
Ein Doppelklick auf einen Eintrag fügt die Zeichenfolge in das SQL-Fenster ein.
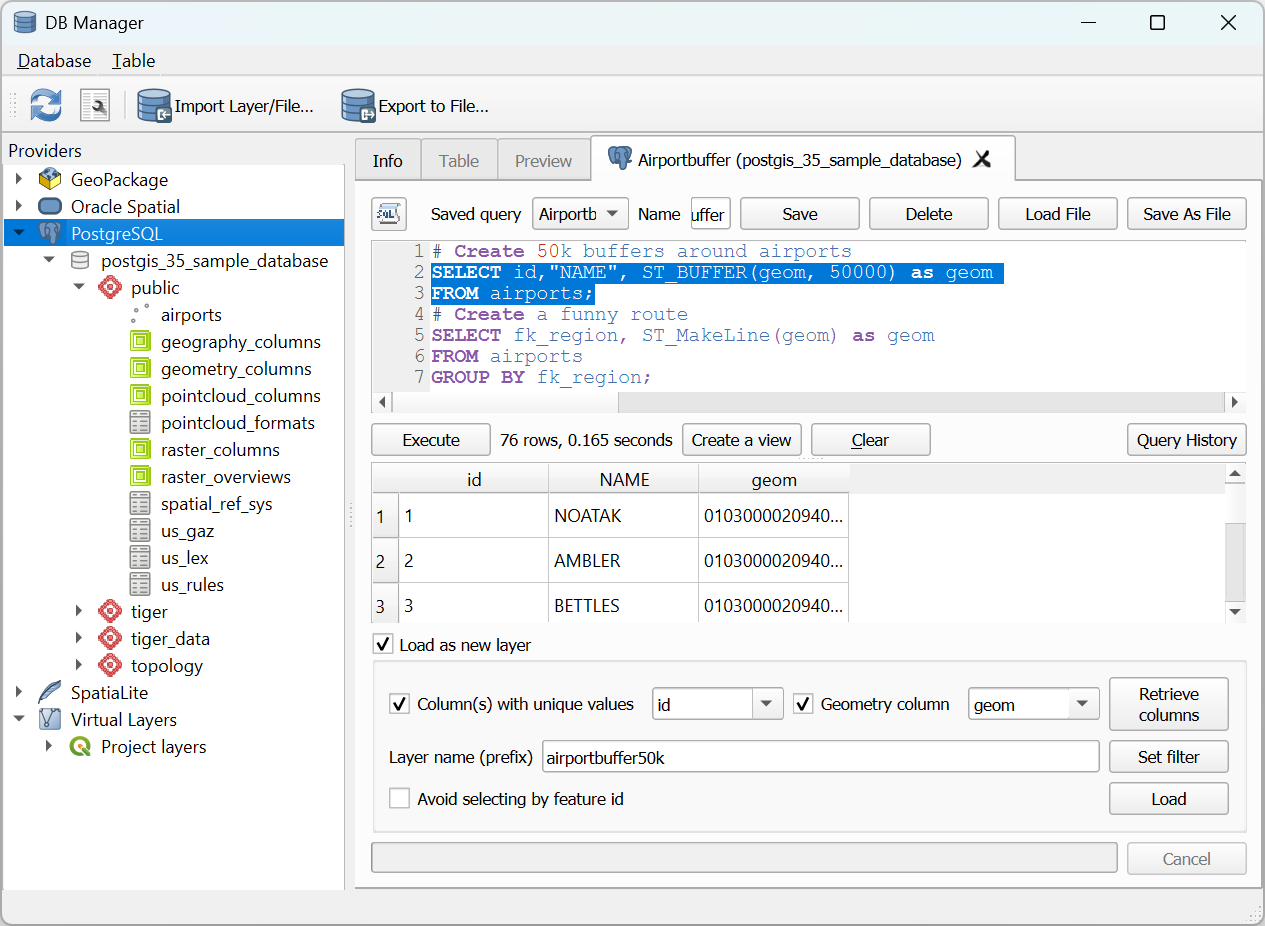
Abb. 25.5 Ausführen von Abfragen im SQL-Fenster der DB-Verwaltung
Bemerkung
Das SQL-Fenster kann auch zur Erstellung virtueller Layer verwendet werden. In diesem Fall wählen Sie im Datenanbieter-Fenster statt einer Datenbank Projektlayer unter Virtuelle Layer aus, bevor Sie das SQL-Fenster öffnen. Siehe Erstellen von virtuellen Layern für Anweisungen zur zu verwendenden SQL-Syntax.
25.2.1.2. Import Vector Layer
You can import layer or file into your database. Here are the parameters you can set for the import process:
Input: Select the layer or file to import. Using the dropdown menu, select from the list of loaded layers in QGIS or click on the … button to select a file from disk. Check the
 Import only selected features to import only the selected
features of the layer.
Import only selected features to import only the selected
features of the layer.Output table: Choose the Schema and provide a name for the new table.
Options: Here are some options for the import process:
- Primary key: Provide naming for the primary key field.
By default, it is named
id. - Geometry column: Provide naming for the geometry column.
By default, it is named
geom. - Source SRID: Define the SRID for the geometry column.
By default, it uses the layer’s CRS.
- Target SRID: Define the target SRID to reproject the geometries
during the import process. By default, it uses the layer’s CRS.
- Encoding: Define the encoding of the source data. By default, it uses
Automatic. It is QGIS’s automatic detection mode that attempts to guess the file’s character encoding based on available metadata or system locale. - Replace destination table (if exists): If a table with the same name already exists in the selected schema,
it will be replaced.
- Do not promote to multi-part: Geometries will be imported as single-part geometries.
- Convert field names to lower case: All field names will be converted to lower case.
- Create spatial index: A spatial index will be created on the geometry column after import.
- Comment: Add comments to table. Only available for PostgreSQL databases.
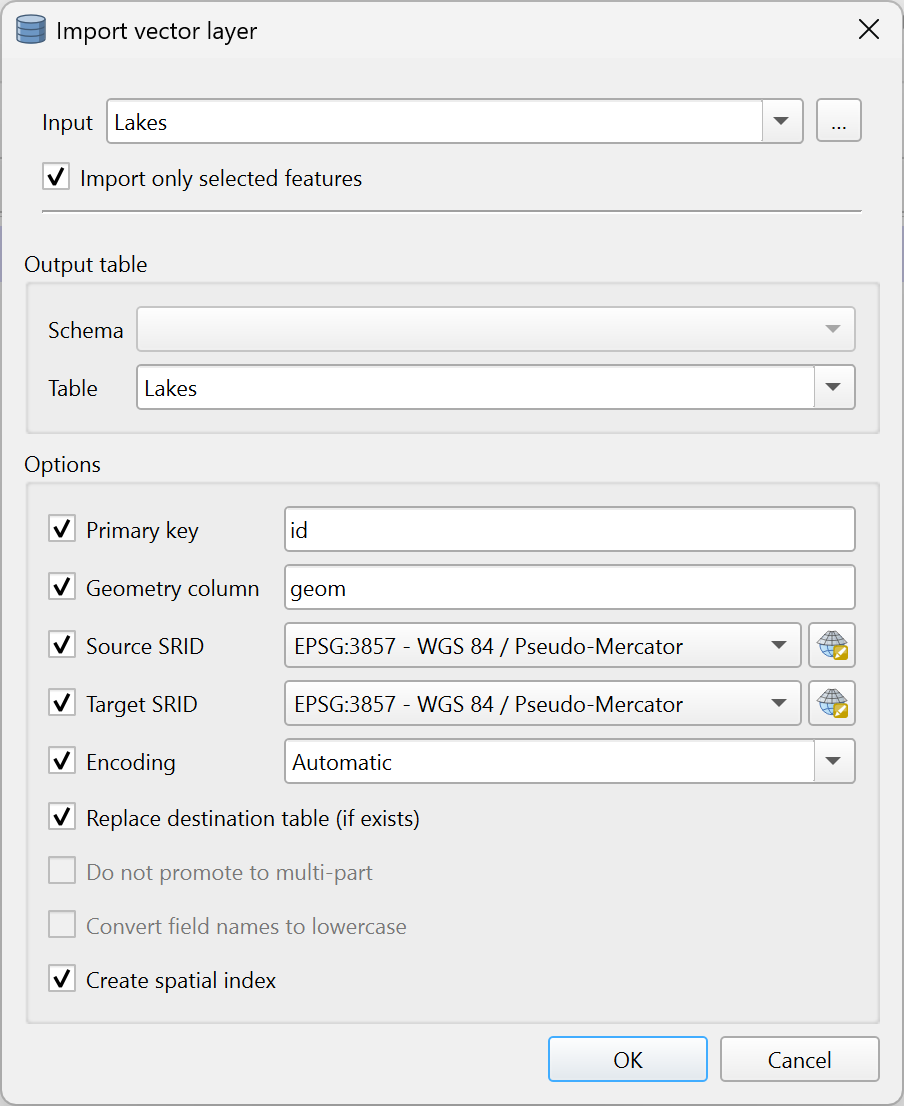
Abb. 25.6 Importing a vector layer into a spatial database using DB Manager
25.2.1.3. Export to Vector File
To export a table from your database to a vector file, select the desired Format and Save as location. Under Options, you can set the following parameters:
- Source SRID: Define the source SRID of the geometry column.
By default, it uses the layer’s CRS.
- Target SRID: Define the target SRID to reproject the geometries
during the export process. By default, it uses the layer’s CRS.
- Encoding: Define the encoding of the output data.
- Replace destination table (if exists): If a table with the same name already exists at the selected location,
it will be replaced.
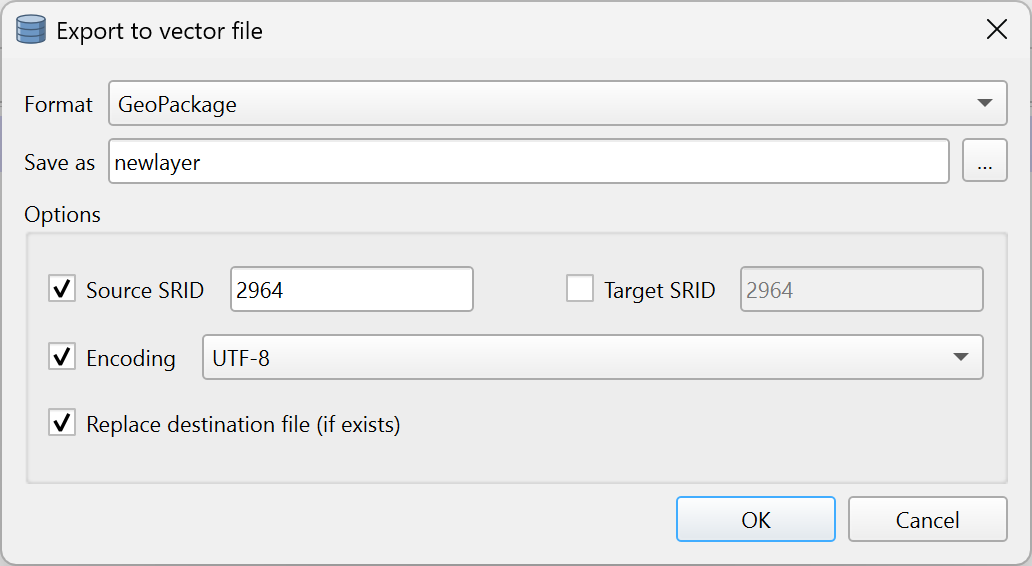
Abb. 25.7 Exporting a table to a vector file using DB Manager