Wichtig
Übersetzen ist eine Gemeinschaftsleistung Sie können mitmachen. Diese Seite befindet sich derzeit im |Übersetzungsprozess|.
2.1. Lektion: Ein Überblick über die QGIS-Benutzeroberfläche
Wir werden die QGIS-Benutzeroberfläche erkunden, damit Sie mit den Menüs, Werkzeugleisten, der Kartenansicht und der Layerliste vertraut sind, die die Grundstruktur der Benutzeroberfläche bilden.
Das Ziel dieser Lektion: Die Grundlagen der QGIS-Benutzeroberfläche verstehen.
2.1.1. ★☆☆ Probieren Sie es selbst:

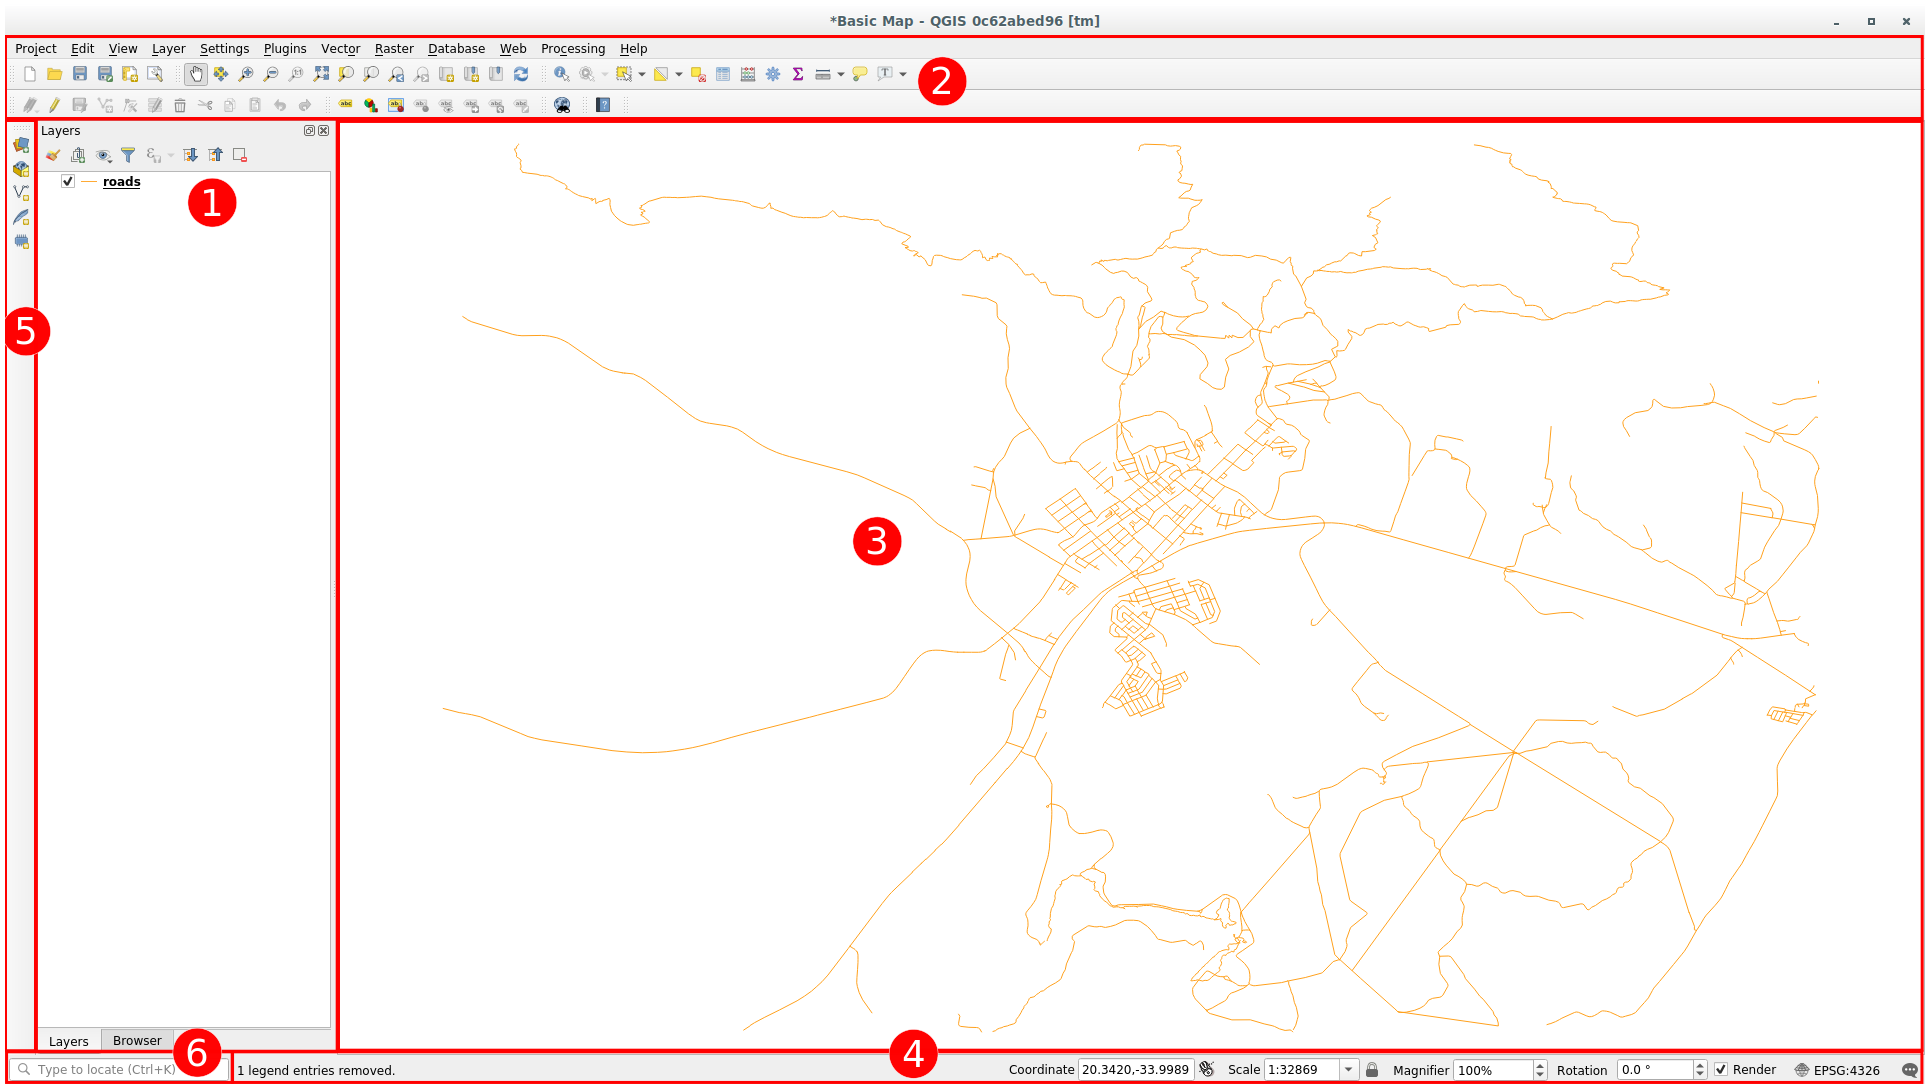
Die in der obigen Abbildung identifizierten Elemente sind:
Layerliste / Browser-Feld
Werkzeugleisten
Kartenansicht
Statusleiste
Seitliche Werkzeugleiste
Suchleiste
★☆☆ Probieren Sie es selbst:
In der Layerliste können Sie jederzeit eine Liste aller für Sie verfügbaren Layer sehen.
Durch das Erweitern reduzierter Elementeninformationen (durch Klicken auf den Pfeil oder das Plus-Symbol daneben) erhalten Sie weitere Informationen zum aktuellen Erscheinungsbild des Layers.
Wenn Sie mit der Maus über den Layer fahren, werden Ihnen einige grundlegende Informationen angezeigt: Layername, Geometrietyp, Koordinatenreferenzsystem und der vollständige Pfad des Standorts auf Ihrem Gerät.
Wenn Sie mit der rechten Maustaste auf einen Layer klicken, wird ein Menü mit zahlreichen zusätzlichen Optionen angezeigt. Einige davon werden Sie bald verwenden, also schauen Sie sich um!
Bemerkung
Ein Vektorlayer ist ein Datensatz, normalerweise von einem bestimmten Objekttyp, wie etwa von Straßen, Bäumen usw. Ein Vektorlayer kann entweder aus Punkten, Linien oder Polygonen bestehen.
★☆☆ Das Browserfeld
Der QGIS-Browser ist ein Feld in QGIS, mit dem Sie einfach in Ihrer Datenbank navigieren können. Sie haben Zugriff auf gängige Vektordateien (z. B. ESRI Shapefile- oder MapInfo-Dateien), Datenbanken (z. B. PostGIS, Oracle, SpatiaLite, GeoPackage oder MS SQL Server) und WMS/WFS-Verbindungen. Sie können auch Ihre GRASS-Daten anzeigen.
Wenn Sie ein Projekt gespeichert haben, erhalten Sie über das Browserfenster auch schnellen Zugriff auf alle Layer, die im selben Pfad wie die Projektdatei unter dem Element . ![]() Project Home gespeichert sind.
Project Home gespeichert sind.
Darüber hinaus können Sie einen oder mehrere Ordner als Favoriten festlegen: Suchen Sie in Ihrem Pfad und klicken Sie, sobald Sie den Ordner gefunden haben, mit der rechten Maustaste darauf und dann auf Als Favorit hinzufügen. Ihr Ordner sollte dann im Eintrag ![]() Favorites angezeigt werden.
Favorites angezeigt werden.
Tipp
Es kann vorkommen, dass die zu Favoriten hinzugefügten Ordner sehr lange Namen haben: Keine Sorge, klicken Sie mit der rechten Maustaste auf den Pfad und wählen Sie die Option Favoriten umbenennen..., um einen anderen Namen zu vergeben.
★☆☆ Werkzeugleisten
Die am häufigsten gennutzten Werkzeuge können für einen einfacheren Zugang in Werkzeugleisten zusammengefasst werden. Mit der Werkzeugleiste Projekt z.B. können Sie ein Projekt speichern, laden, drucken und auch ein vollkommen neues anlegen. Sie können die Bedienoberfläche ganz einfach anpassen, damit Sie nur die Werkzeuge sehen, die Sie am meisten nutzen, indem Sie über das Menü Werkzeugleisten hinzufügen oder wegschalten.
All Ihre Werkzeuge bleiben über Menüpunkte zugänglich, selbst wenn sie in keiner Werkzeugleiste angezeigt werden. Z.B. können Sie die Werkzeugleiste Projekt (enthält die Schaltfläche Speichern) wegschalten und immer noch Ihre Karte speichern, indem Sie das Menü Projekt öffnen und darin auf Speichern klicken.
★☆☆ Die Kartenansicht
In der Kartenansicht wird die Karte selbst angezeigt und in sie werden neue Layer geladen. Darin können Sie mit den sichtbaren Layern interagieren: hinein- bzw. herauszoomen, die Karte bewegen, Objekte auswählen und viele andere Tätigkeiten, die wir uns in den nächsten Abschnitten vertieft ansehen werden.
★☆☆ Die Statuszeile
Die Statuszeile enthält Informationen über die aktuelle Karte. Darin können Sie den Maßstab und die Drehung der Karte verändern sowie die Koordinaten des Mauszeigers auf der Karte sehen.
★☆☆ Die seitliche Werkzeugleiste
Standardmäßig enthält die seitliche Werkzeugleiste alle Schaltflächen, mit denen Sie Layer laden oder neue Layer erzeugen können. Denken Sie aber daran, dass Sie alle Werkzeugleisten an eine für Sie geeignete Position verschieben können.
★☆☆ Die Suchleiste
Innerhalb der Suchleiste haben Sie Zugriff auf beinahe alle Inhalte von QGIS : Layer, Objekte, Verarbeitungswerkzeuge, räumliche Lesezeichen usw. Sehen Sie sich all die Möglichkeiten im Abschnitt Suche im Benutzerhandbuch von QGIS an.
Tipp
Greifen Sie mit dem Tastenkürzel Ctrl+K auf das Suchfeld zu.
2.1.2. ★☆☆ Probieren Sie selbst: 1
Identifizieren Sie die vier oben genannten Elemente auf Ihrem Bildschirm, ohne auf die Abbildung oben zu sehen. Versuchen Sie, ihre Namen und Funktionen zu benennen. Die Elemente werden Ihnen vertrauter, wenn Sie sie in den nächsten Tagen benutzen werden.
Antwort
Sehen Sie sich nochmals das Bild mit der Benutzeroberfläche an und prüfen Sie, ob Sie sich an die Namen und Funktionen der Elemente erinnern.
2.1.3. ★☆☆ Probieren Sie selbst: 2
Versuchen Sie, diese Werkzeuge auf Ihrem Bildschirm zu finden. Welchen Zweck haben sie?
Bemerkung
Sollte irgendeines dieser Werkzeuge auf Ihrem Bildschirm nicht zu sehen sein, versuchen Sie einige der Werkzeugleisten zu aktivieren, die im Moment abgeschaltet sind. Denken Sie auch daran, dass eine Werkzeugleiste verkürzt und einige ihrer Werkzeuge versteckt sein können, wenn auf dem Bildschirm kein Platz mehr ist. Zeigen Sie die versteckten Werkzeuge an, indem Sie in einer eingeklappten Werkzeugleiste auf den Doppelpfeil rechts klicken. Wenn Sie den Mauszeiger für einen Moment über eines der Werkzeuge halten, wird in der Kurzinfo der Name dieses Werkzeugs angezeigt.
Antwort
Speichern als
Auf Layer zoomen
Objektauswahl umkehren
Zeichnen an/aus
Linie messen
2.1.4. Was als nächstes?
Da Sie jetzt mit den Grundlagen der Benutzeroberfläche von QGIS vertraut sind, werden wir uns in der nächsten Lektion ansehen, wie Sie einige der gängigen Datentypen laden.


